Simulate a campaign
Watch this video for more information on simulating an experiment.
Simulation mode lets you check whether:
- Your variations or personalizations are displayed correctly.
- Your campaign's targeting is configured correctly, and if not, understand why.
- The goals you have set are converting.
- Your visitors see the right content for them, at the right time.
Open the simulation panel
From the Graphic editor
A new browser window will open displaying the simulation with a control panel at the bottom of the screen. This panel provides various options. To maximize the simulated webpage view, click Hide to collapse the panel. To reopen the panel, click Show.

From the Code editor
To simulate your experiment in the Code editor, click Simulate in the top right corner of the page. A new browser window will open displaying the experiment simulation with a control panel. Collapse the panel by clicking Hide and reopen it using Show.
From the Personalization creation page
Kameleoon lets you review your personalization, targeting criteria, and display configurations prior to deployment. To launch a preview, locate and click the Simulate button situated at the bottom of the personalization creation interface.
![]()
A new browser window will open, presenting the simulation. A control panel will appear at the bottom of this window, offering various options. To enlarge the simulated webpage view, click Hide. To restore the control panel, click Show.
From the dashboards
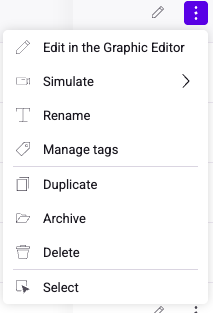
You can initiate the simulation from your dashboards (Experiment and Personalization). To do this, access the secondary actions associated with a campaign card.
Structure of the simulation panel
The simulation panel consists of five primary tabs:
- Preview
- Campaigns
- Segments
- Triggers
- Conversions
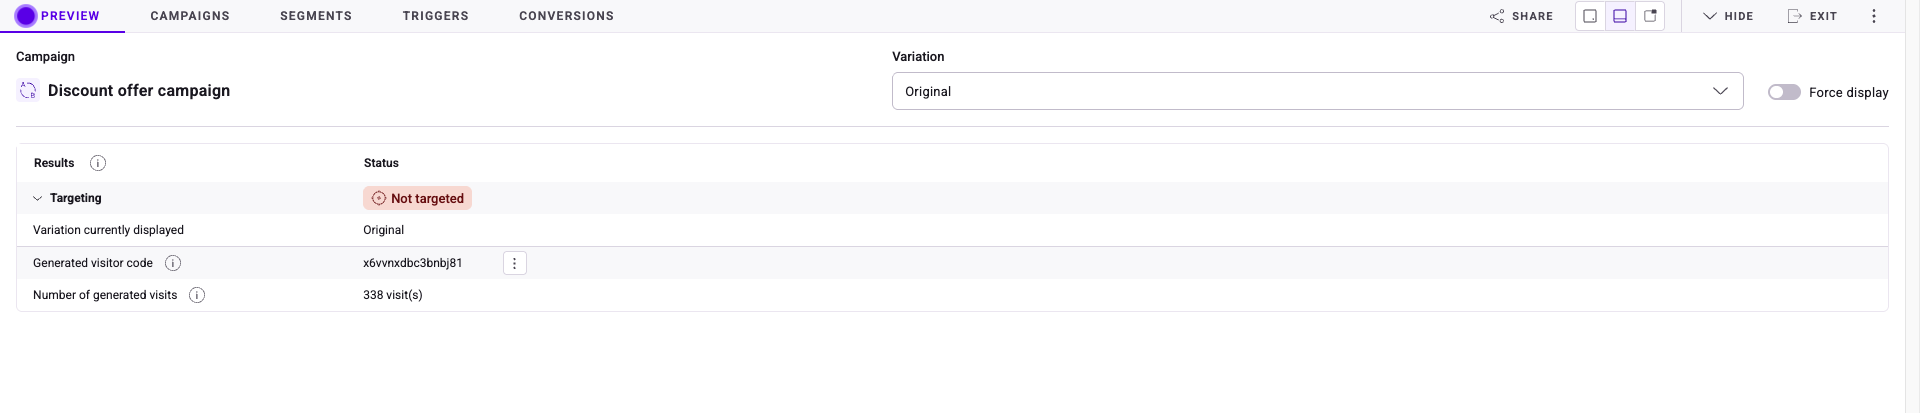
Preview
The Preview tab lets you simulate how your campaign will behave before publishing it live. It shows which variation is currently displayed, whether targeting conditions are met, and details about the generated visitor session.
Key sections
- Variation selector:
- Use the dropdown in the top-right to select which variation (for example, Original, Variation 1) you want to preview.
- Force display toggle:
- By default, variations only display if targeting conditions are met. Switching Force display to on overrides targeting rules and forces the chose variation to render. Status will also change to Targeted.
- Results:
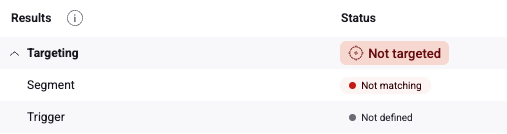
- Shows whether your campaign is targeted for the current simulation.
- For example, Not targeted indicates that the current visitor/session does not meet targeting conditions.
- Click Targeting to view more details on your current visit's targeting.
- Variation currently displayed:
- Indicates which variation is being rendered in the preview.
- Generated visitor code:
- Each simulation generates a unique visitor code, which you can use to reproduce or share the same preview session.
- Click the three-dots menu to generate a new visit or reset visit data.
- Each simulation generates a unique visitor code, which you can use to reproduce or share the same preview session.
- Number of generated visits:
- Displays how many times the simulated visitor has visited the site. You can generate a new visit or reset visit data using the three-dots menu next to the visitor code.
Typical use cases
- Checking if a campaign correctly targets the intended audience.
- Previewing different variations of a campaign.
- Debugging targeting issues.
- Forcing the display of a variation regardless of targeting.
Campaigns
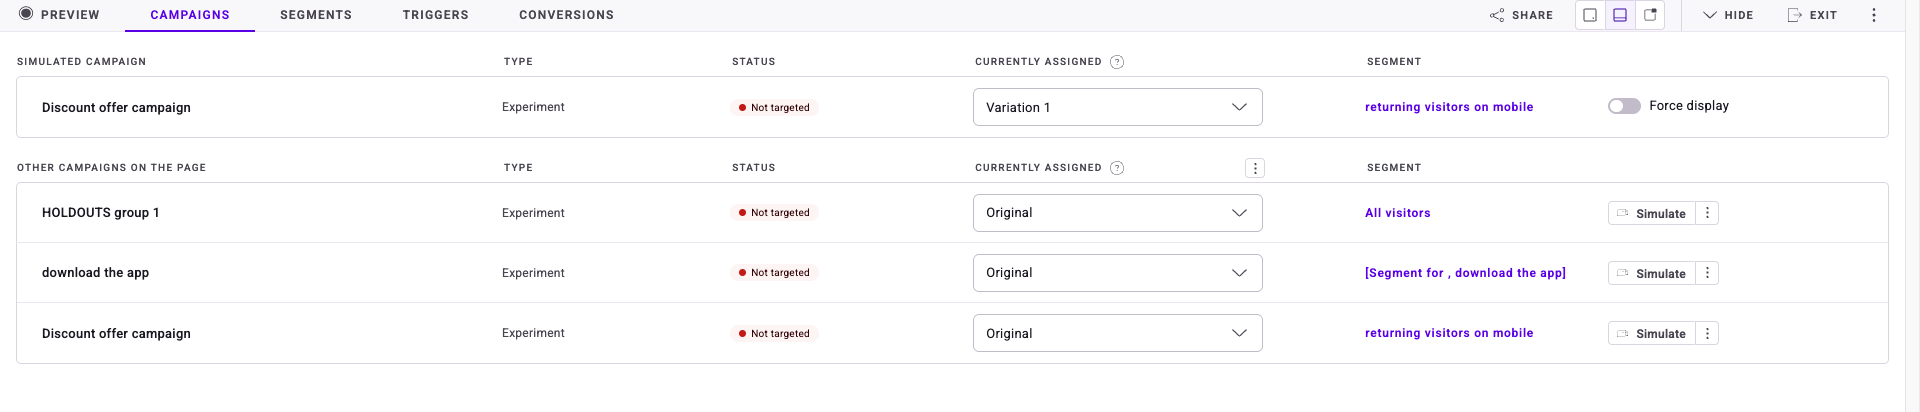
The Campaigns tab shows the campaign currently being simulated and other campaigns that may be running on the same page. It helps you preview how multiple campaigns interact and verify targeting, variation assignment, and conflict.
Key sections
- Simulated campaign:
- Displays the campaign you are currently simulating.
- Type: Indicate if it's an experiment or personalization.
- Status: Shows whether the campaign is currently targeted (Not targeted if the simulation visitor does not meet conditions).
- Currently assigned: Dropdown to choose which variation is displayed.
- Segment: Lists the visitor segment being targeted.
- Force display: Overrides targeting rules to display the selected variation.
- Displays the campaign you are currently simulating.
- Other campaigns on the page:
- Lists all additional campaigns that would also run on the current page. For each campaign:
- Type: Experiment or personalization.
- Status: Whether the campaign is targeted or not.
- Currently assigned: Dropdown to preview a specific variation.
- Segment: The segment targeted by that campaign.
- Simulate button: Allows you to run a simulation of that campaign in isolation.
- Exclude: Click the three-dots menu > Exclude to exclude a campaign from the simulation. Click the three-dots menu > Undo exclusion to include it again.
- Lists all additional campaigns that would also run on the current page. For each campaign:
Typical use cases
- Checking which campaigns are active for a given page and why some may not be targeted.
- Seeing how the simulated campaign interacts with others on the page.
- Manually assigning variations across multiple campaigns to reproduce specific scenarios.
- Verifying overlapping campaigns and adjust targeting or priority as needed.
Segments

The Segments tab lets you test how different visitor profiles interact with your campaign.
Key sections
- Type: Displays the type of segment.
- Condition: The condition which visitors must fulfil to be targeted.
- Status: The current visitor's status based on whether they fulfil the condition's criteria.
- Value: The current visit's value for each condition (Desktop if visitor is on desktop).
- Boolean operators: The segment's boolean operators are displayed to the right of the conditions. If AND, all conditions must be met for a visitor to be targeted as part of the segment. If OR only a limited number of conditions must be met.
Typical use cases
- Viewing the interaction of your experiment's segments.
- Seeing whether a visit matches your segments' criteria.
- Ensuring your segments are correctly defined.
Triggers
The Triggers tab displays the conditions that must be met for your campaign to launch. It lets you confirm whether each trigger is correctly recognized during simulation.
Key sections
- Targeting status: The overall targeting results (Targeted or Not targeted). This section quickly shows whether the simulated visitor meets the campaign's targeting rules.
- Trigger list:
- Each trigger is listed with the following details:
- Name: The label assigned to the trigger.
- Type: The type of trigger.
- Condition: The rule that must be satisfied for the trigger to apply.
- Status: Indicated whether the condition is currently met (True or False).
- Value: The measured value for the simulated visitor.
- Each trigger is listed with the following details:
Typical use cases
- Ensuring your campaign launches only when the correct conditions are met.
- Simulating visitors who almost—but not quite—meet a trigger, to confirm expected behavior.
- Quickly spotting why a campaign didn't trigger by checking condition values (for example, not enough page views).
Conversions

The Conversions tab shows how your simulated visitor interacts with the goals associated with your campaign. It helps you verify whether conversions are tracked correctly during testing.
Key sections
- Associated goals: Displays all goals linked to the campaign, including the Primary goal (highlighted as such).
- Status: Shows whether each goal has been met during the simulation.
- Converted (green) if the simulated visitor triggered the goal.
- Not converted (red) if the visitor did not.
- Number of conversions: Indicates how many times the simulated visitor triggered the goal (useful for goals that can occur multiple times, like page views).
- Goal ID: The unique identifier for each goal, useful for troubleshooting or cross-referencing in reports and implementation.
- Revenue: Displays any revenue attributed to the goal (if revenue tracking is configured).
Typical use cases
- Confirming that goals fire correctly when their conditions are met.
- Ensuring the primary goal is properly set and measured alongside other goals.
- If a goal does not convert as expected, using the simulation to pinpoint why.
- Verifying that revenue is correctly captured and linked to conversions.
Toolbar
![]()
There is a toolbar in the simulation panel, providing you with several options.
Share
Click Share to access options to share your simulation. You can share via:
- URL: Click Copy to copy the URL to your clipboard.
- QR code: Switch to QR to get a scannable QR code linking to your simulation.
Views
Click any of the three available options to minimize, maximize, or customize the size of the simulation panel.
![]()
Hide
Click Hide to hide the simulation panel. Click the blue simulation icon to reopen the panel.
Exit
Click Exit to exit simulation mode. You will return to the domain you're simulating.
Secondary actions
Click the three-dots menu to access available secondary actions:
- Language: Click Language to edit the simulation panel's language. Select the language from the dropdown menu and click Save.
- Generate new visit: Click Generate new visit to add a new simulated visit to your site. Conversion and visit data will be updated accordingly.
- Reset visitor: Click Reset visitor to reset all visit data. Conversions and visits are set to zero.